Homeowners should be proactive about repairing their decks to ensure the safety and longevity of the structure. Prioritizing ongoing preventive maintenance and working with a reputable contractor can make repairs more cost-effective than replacement.
Use a screwdriver to poke around wooden areas of the deck, paying special attention to those that come into contact with the ground. Wood that feels soft or spongy may be rotted. Contact Deck Builders Baltimore for professional help.
Before you start tearing down your deck to replace damaged boards, take the time to conduct an extensive assessment of its current state. The assessment will help you determine what type of repair work is needed, whether structural or cosmetic. Structural issues often manifest themselves as significant splintering and warping of deck boards. Loose nails, screws and bolts can also compromise the structural integrity of your deck. Inspect your wood for signs of wet rot and termite infestation. If you suspect either, contact a pest control expert to have the problem taken care of before proceeding.
Wet rot is caused by prolonged exposure to moisture, which can lead to fungi like mold and mildew that break down the wood fibers. This type of damage is common in buildings, but can also happen to decks that are not protected by sealers or stains. A leaky roof, improper flashing or ground moisture can all contribute to wet rot.
Dry rot is less common, but it can still be damaging to your deck. The main difference between wet and dry rot is that wet rot needs a constant source of moisture to spread, while dry rot relies on the wood itself to grow. If you have a wood deck, you need to inspect it regularly for signs of both wet and dry rot.
If you spot a spot of wet rot, it’s important to fix the issue quickly so that it doesn’t spread and affect the rest of your deck. In addition to repairing the affected area, you may need to remove and replace all of your deck boards to ensure that your deck is safe for use.
To repair the damage, you will need to have a number of tools and materials on hand. These include a 5-in-1 rasp, chisel, claw hammer, screwdriver and some type of wood hardener, filler or epoxy. You will also need a putty knife and a level. Before you start removing the rotten boards, use your screwdriver to probe the area. If the tip sinks in easily, you have wet rot and need to replace all of your deck boards. Otherwise, you will be able to repair the affected areas by using a wood filler or epoxy and reattaching them with nails.
Remove Damaged Components
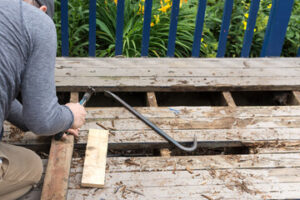
Before you can get started on your deck repair project, it’s important to remove any damaged components. This includes splintered or warped boards, as well as railings that are loose or missing rungs or balusters. Removing these damaged elements can help ensure that your deck is safe to use and improves the overall appearance of the area.
Loose or rotting boards should be removed using a pry bar and claw hammer, being careful not to damage any other board that’s still intact or the underlying joists. Once the old boards have been removed, it’s important to inspect the joists and beams for signs of moisture or mildew. Mildew can lead to rot, so it’s important to keep this area as dry as possible by applying Trex Protect joist tape to the affected areas.
Another important component of a stable deck is the ledger board, which connects the deck to the house. This long, horizontal piece is essential for the stability of the deck, and it can be a major safety concern if it’s not properly attached or in poor condition. Look for soft spots, discoloration, or a musty odor when inspecting your deck ledger board, and consider replacing it if you notice any of these signs.
Decks can also suffer from deterioration in the form of cracked or sagging boards, unstable railings, and wobbly stairs. Stabilizing these structures with new fasteners, repairing or replacing damaged boards, and sanding rough surfaces can help restore the strength of your deck and make it more comfortable to walk on.
It’s always wise to consult a professional for deck repair services, especially when working with heavy materials and tools. They can often complete the work faster and more effectively than a homeowner, and their work usually comes with a warranty. In addition, they have the experience and expertise to spot potential issues that might go unnoticed by the average homeowner and address them before they become major problems that could affect your deck’s lifespan. Deck repair projects can be tricky, but a little preventative maintenance goes a long way to prolonging your deck’s life and improving its overall appearance.
Prepare for the Work
Like many home improvement projects, deck repair can be a time-consuming and challenging task for homeowners. However, timely repairs can prevent more extensive and expensive problems down the road. The best way to know if your deck requires repairs is by performing a thorough inspection of the surface and structural components of your deck. This evaluation will help you determine if a deck replacement is necessary, or whether you can improve its functionality and appearance by making simple repairs.
Wood rot, termite infestation, and damage to structural components such as beams and joists are common deck repair issues that need to be addressed quickly. If left untreated, these problems can lead to severe structural damage that could threaten the safety of your family and guests. Addressing these issues early with a few simple steps will extend the life of your deck and protect its value.
Water damage is another frequent deck repair issue. Moisture buildup causes rot and warping of wood, while poor drainage exacerbates the problem. Regular cleanings, proper drainage channels, and preventive treatment can greatly reduce moisture damage.
Loose nails, screws, and bolts can also cause serious safety concerns if not fixed promptly. These loosening issues are caused by constant use and weather fluctuations, as well as vibrations from foot traffic. During your deck inspection, it is a good idea to check and tighten all fasteners.
Lastly, look for signs of unevenness, sagging, and loose boards. These issues indicate that the deck’s foundation is not in good condition and may require a full replacement. Composite and PVC decking is resistant to sagging, cracking, and warping, so it can last much longer than traditional wood.
It’s important to note that replacing your deck is a major undertaking that should only be undertaken by a professional contractor with experience and knowledge of proper installation. Unlike repairing existing issues, deck replacement involves substantial labor costs and requires specialized tools that are not always readily available to the average homeowner. Having a professional perform the work ensures that your deck is safe and structurally sound.
Start the Work
Decks offer a wonderful place to entertain and relax with friends, but like any other home improvement project, it requires regular maintenance and repairs. This preventative work keeps your outdoor space functional and safe, and it helps to extend its lifespan.
A few simple, timely repair efforts can often avoid the need for more extensive, time-consuming, and expensive work down the road. These fixes can be as minor as securing a loose railing or as complex as replacing rotten stair treads and balusters. With basic carpentry skills and the proper tools, most homeowners can tackle these tasks themselves.
Before the actual repair work starts, you should perform a thorough inspection of your deck. Look for splintered or warped deck boards, wobbly railings, mildew, and other signs of aging. This is also a good opportunity to make sure your decking and rails are secure and free of any pests such as wasps or termites. Check the substructure for any areas of rot or water damage, as well. You should also examine the flashing to make sure it is still in good condition, preventing rainwater from entering where your porch, deck, or stairs connect to your house.
Once you’ve made a list of what needs to be repaired, it’s time to get started. Begin with any board-by-board repairs, focusing on the most damaged areas first. A hammer and pry bar can help you remove any damaged planks, but be careful not to harm the underlying joists. A circular saw can help you cut new planks to size, ensuring they’re a perfect fit. If necessary, a drill or screw gun can be used to install the replacements.
Once the repairs have been completed, it’s a good idea to apply deck stain and sealant so that your new boards can weather properly. If you’re using traditional lumber, this is especially important to prolong their life. Composite decks, however, are more resistant to weathering and fading than traditional wood decking, so they may require less stains or sealants. Check with your composite manufacturer to learn more about this.